11/27/2006

prosciutto palmiers

Some think you need a veritable party before you make finger foods, but our party of three (Glenda came to visit!) was excuse enough for these darn tasty treats. (If you're interested, link to her blog for the scoop.)

These appies are from my Hors d'Oeuvres cookbook (judging this book by its cover, I'd say they revised it since I got mine). You have to think ahead a bit in order to have a sheet of puff pastry thawed, but you can whip up these morsels pretty quickly.

prosciutto palmiers
makes 20

1 sheet of puff pastry, thawed
2 tsp Dijon mustard
4 tsp honey
2.5 oz (75 g) sliced prosciutto
freshly grated parmesan cheese
1 egg yolk beaten with a dash of water

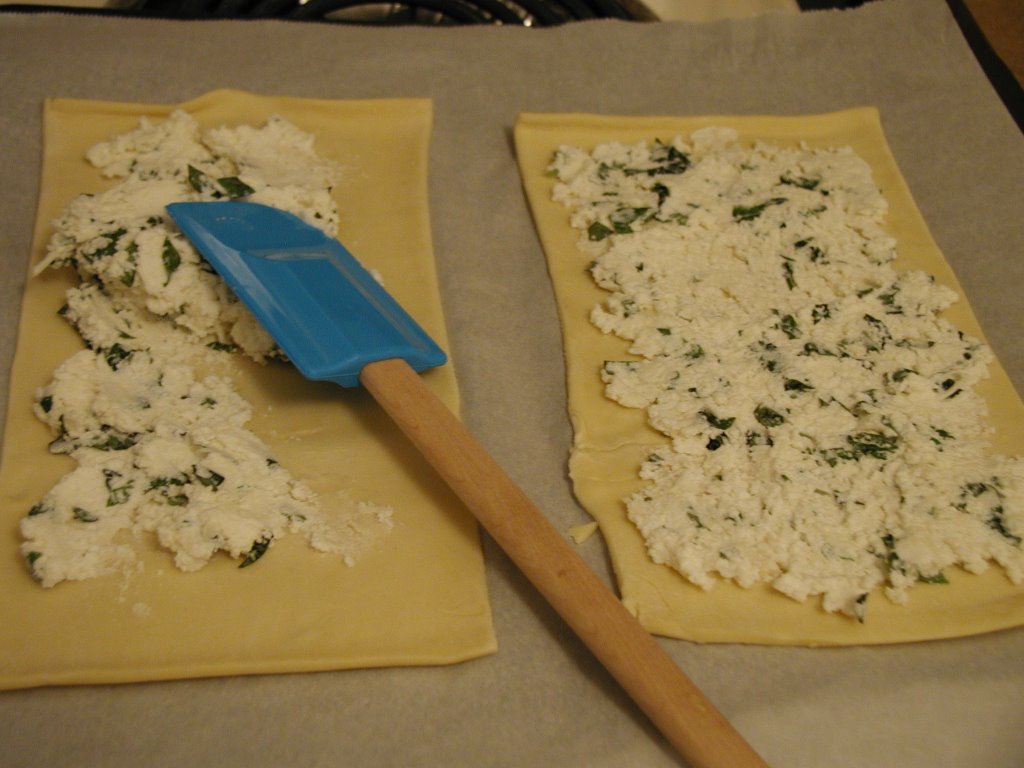
Unroll pastry to a rectangle (6" x 14"). Trim uneven edges, if necessary. Combine mustard and honey in a small bowl, then spread evenly over pastry. Cover with sliced prosciutto. Sprinkle with a couple tablespoons of parmesan.


Roll up ends tightly to meet in the middle (looks like the game binoculars that Clay and I used to play when we were little...two little kiddies rolling up each side of a blanket). Refrigerate until firm (15 mins).
Preheat oven to 400. Brush egg wash on all sides, then cut into 1/2" or 1 cm slices. Place slices on parchment-lined baking sheet and bake until crisp and golden (10-15 mins). Sprinkle with a bit of parmesan when hot from the oven. Cool on wire rack and serve warm or at room temp.

11/26/2006

nifty magnets, take two

Remember my marble magnets? Well I've been at it again. This time, they are for a stocking stuffer for my dad, so I made them from picts of his kids and grandkiddies. ...I think they're all (and we're all) turning out to be pretty cute.

A word of warning though -- It took me several attempts to get the heads scaled down to be small enough for a little magnet -- a learning curve that turns out to be sort of spendy on a colour copier!

11/22/2006

hoppy and bitter brew

We've been brewing again! It's time for bottling up our lovely hoppy ale. This batch is going to be quite bitter since we used double the hops and malt from last time. Bitter beer face for me, happy beer face for Jeff.

siphoning into the ale pail

filling the bottles

the fun bottle capper thingy

50 red-star bottles!
Now we just have to wait a few weeks to crack one open.

11/20/2006

nubby green scarf


One gift down, several more to go!

This nubby scarf will be part of an xmas gift for the ma-in-law. She picked out the yarn -- she wanted something soft and non-itchy, and that would match her winter wares. (I wish the colour had turned out better in this picture -- it's really very green and navy.)


11/18/2006

sticky sweet sesame chicken

Rice served with some sort of sticky goodness is always appealing to me. This recipe was inspired in part by the "sticky thai chicken" recipe from this Donna Hay book.

sticky sweet sesame chicken
for 2

2 teas sesame oil
1 teas dried red pepper flakes
1 Tbs grated ginger
3 Tbs fresh lime juice
3 Tbs oyster sauce
1/4 cup brown sugar
2 chicken breasts, pounded and cut in half
sesame seeds


In two small bowls, prep ingredients: oil, red peppers, and ginger in one, and lime juice, oyster sauce, and sugar in the other. In a large pan over med-high heat, cook the oil/pepper/ginger mix for about a minute. Then, stir in the lime/oyster/sugar mix and cook for another minute.

Add chicken pieces and cook for 6-8 minutes, until almost done. Increase heat, turn chicken, sprinkle with sesame seeds and cook for another few minutes until it's sticky and golden (and cooked through).

It's yummy served with rice and steamed/sauteed veggies.

11/13/2006

when life gives you lemons, make lemon pudding cake

Lemony desserts are so satisfying. The tart and sweet flavour always seem the perfect ending to any type of meal. This lemony dessert was inspired from Gourmet magazine (circa 2001 or 2002).

lemony pudding cake
makes 6


2 large lemons
1/4 cup flour
1/4 teas salt
3/4 cup plus 2 Tbs sugar
3 large eggs, separated
1 1/3 cups milk


Preheat oven to 350F. Prepare ramekins by lightly buttering and sugaring, knocking out any excess sugar. Place in towel-lined baking pan.


Zest two lemons for about 1 Tbs of fine zest. Then, squeeze 1/4 cup plus 2 Tbs of lemon juice.

Combine flour, salt, and 1/2 cup plus 2 Tbs sugar in a large bowl. Whisk together. In another bowl, whisk yolks and milk with the zest and juice. Add two mixes together until just combined.


Beat egg whites in a large bowl until they hold soft peaks. Beat in remaining 1/4 cup sugar, a little at a time, and beat until whites hold stiff, glossy peaks. It's very meringue-like at this stage.

Whisk a little of the whites into the batter, then fold in remaining whites gently but thoroughly. (The batter will be quite thin.)


Pour mix into prepared ramekins.
Pour hot water into baking pan until about 1/2-way up the sides of the ramekins.


Bake in the hot water bath until puffed and golden (about 45 mins). The sides will pull away from the edge. Remove from the bath and let cool on a rack. Wait a bit to enjoy them slightly warm or let them cool to room temp.


I inverted the ramekin
onto a plate so the pudding and cake layers were more visible, but it would taste just as good spooned out of the ramekin (with a little dusting of powdered sugar).


11/10/2006

teacup candles

I've been hunting pretty teacups from garage sales and thrift stores for a while now, planning to make these lovely candles (Martha's "good idea" from her Dec 2002 mag). Here are lots of pictures of the process...

Supplies: two pans (one smaller than the other, for nesting), leftover candles, teacups (duh), wick sustainers, new wicking, chopsticks, a wrench (or pliers), and a kitchen torch (optional -- but fun)


A collection of teacups waiting for reincarnation


To start, melt down old candles in nested pans over simmering water. (Martha says to monitor the temp at 185 degrees, but I didn't even take the temperature once--no harm done). Fish out any old wicks in your melted candles.

Cut pieces of wicking to the cups height, plus about 2 inches. Clamp one end of the wick into a sustainer with a wrench, then dip wicking and sustainer into the pot of hot wax to coat them.

Stick the wax coated sustainers to the bottom of the cups. Twist the other end of the wicking around a skewer or a chopstick.

Pour in the hot wax, stopping about 1/2 inch below the rim.


Let the wax cool...


As it cools, the wax will make all sorts of weird indents in the surface. To level out the surface, Martha recommends pricking a holes in the surface and adding more hot wax to the tea cup. But since I didn't make enough wax, I had to get creative...

A handy kitchen torch melts the surface perfectly! Be sure to wrap the wick in tinfoil so it won't burn. As the torch heats the surface, the hot wax fills in the grooves.


Let the wax cool again, then cut the wick.

Done! Makes a sweet gift for a dainty pyro.


11/06/2006

indulgent veggie tart

This, my friends, is a great savory tart. Creamy ricotta, fresh basil, and yum parmesan are spread over puff pastry dough and topped with fresh tomato and eggplant -- a simple yet decadent meal. It all started with a Donna Hay recipe and ended up as the following...


indulgent veggie tart
serves 2

1 frozen puff pastry sheet, thawed (or use shortcrust pastry for a thinner, more pizza-like tart)
1/2 cup ricotta cheese
2 Tbs chopped fresh basil
1/4 cup freshly grated parmesan cheese
1 tomato, thinly sliced (or a couple dozen cherry tomatoes, halved)
1/2 small eggplant, thinly sliced (a perfect job for a cheese/veggie slicer)
olive oil
course salt and black pepper


Preheat oven to 350F. Cut puff pastry sheet in half. Place on parchment-lined baking sheet. Combine ricotta, basil, and parmesan. Spread mixture over pastry, leaving a bit of an edge.


Add slices of tomatoes and eggplant (if using cherry tomatoes, put the cut side up). Drizzle with olive oil and spread over eggplant with fingers. Sprinkle with salt and pepper, then bake until golden (25-30 mins).


I wish I had made a simple green salad to enjoy with this rich tart...next time.

11/02/2006

fingerless gloves with cables, oh my

I had never knit a cable before, thinking that they involved twisting and counting -- all the bothersome aspects of knitting. But, thanks to these fetching fingerless gloves, I now have made lots of cables. Turns out, the little designs are easier than they look.

Just after completing my first-ever 9 cables

Done!
Well, almost done.
I still have to make the glove for my right hand...